Website Connector and Sitemap Setup with Salesforce Personalization
How to use this chapter: the first part explains the setup model and key concepts. The second part is the implementation walkthrough you can follow step by step.
What this step covers
This chapter assumes the first two setup steps are already done:
- the build user has the required access,
- Data Cloud is enabled,
- the Salesforce-delivered Personalization foundation is already deployed in the target data space.
From here, the goal is straightforward: set up the web ingestion layer for the playground. That means creating the website connector, preparing the schema, adding the Web SDK, and uploading the sitemap that defines what the site should capture.123
This is not the stage for advanced data modeling, DMO or DLO design, or complex decisioning. Right now the priority is getting a clean, working web data pipeline in place.124
In Salesforce Personalization, the web channel starts with two things working together:
- a website connector in Data Cloud,
- the Salesforce Interactions SDK running on the site.
Together, they give you a controlled way to capture behavior, standardize events, and prepare data for later use in profile updates, segmentation, calculated insights, and personalization requests.254
Without this setup, Personalization may be enabled in the org, but the website still is not sending usable interaction data into the platform.12
What the website connector is
The website connector is the Data Cloud object that represents your website as a source of incoming data. It stores the connector configuration, the uploaded schema, and the integration details you need to add the SDK to the site.123
It helps to separate the roles clearly:
- the connector defines the integration entry point,
- the schema defines the event contract,
- the SDK sends the data,
- the sitemap defines what should be captured and when.254
That distinction becomes important very quickly once you start debugging real traffic.
What “sitemap” means here
In this context, a sitemap is not an SEO XML sitemap.
In Salesforce Personalization, the sitemap is a JavaScript configuration file used by the Salesforce Interactions SDK. Its job is to describe page types, interaction logic, and the data that should be captured as users move through the site.2
In practice, the sitemap answers questions like these:
- which page types matter,
- which interactions should fire,
- which business objects are involved,
- which values should be passed with each interaction.
A good way to think about the sitemap is as a translation layer between the website and Salesforce. It turns page behavior into structured event data that Data Cloud and Personalization can actually use.24
How to think about the schema
When you create the website connector, Salesforce expects a JSON schema. That schema defines which event types the website can send and what fields those events must contain. Salesforce also provides a recommended starting schema for common patterns such as catalog activity, cart activity, orders, consent, and profile updates.2
The simplest way to remember the relationship is this:
For web and mobile connector schemas, Salesforce documents six required fields:
deviceIdeventIddateTimeeventTypecategorysessionId5
Salesforce also groups web events into two main categories:
So even though the SDK is a visible part of the implementation, this step is not just an SDK install. You are defining the contract for the site-to-Data-Cloud integration.
Why the forwarded event shape matters
One detail is easy to miss the first time through: the object you trigger from the sitemap is not always identical to the event that eventually lands in Data Cloud.
The SDK and its CDP-oriented ingestion layer can flatten, enrich, or split interaction data before forwarding it downstream. That means one action in the sitemap can become multiple events in the final event model.246
For example, you might trigger a payload like this from the sitemap:
{
  "interaction": {
    "name": "Add To Cart",
    "lineItem": {
      "catalogObjectType": "Product",
      "catalogObjectId": "sample-product-001",
      "quantity": 1,
      "price": 1999
    }
  },
  "source": {
    "pageType": "Product Page",
    "url": "https://example-store.com/products/sample-product-001",
    "urlReferrer": "https://example-store.com/",
    "channel": "Web"
  },
  "user": {
    "anonymousId": "anon-session-123"
  },
  "consents": []
}
But after processing, the forwarded events can look more like this:
[
  {
    "eventId": "evt-cart-001",
    "dateTime": "2026-03-22T18:36:37.149Z",
    "sessionId": "anon-session-123",
    "deviceId": "anon-session-123",
    "interactionName": "Add To Cart",
    "sourceUrl": "https://example-store.com/products/sample-product-001",
    "sourceUrlReferrer": "https://example-store.com/",
    "sourceChannel": "Web",
    "sourcePageType": "Product Page",
    "category": "Engagement",
    "eventType": "cart"
  },
  {
    "eventId": "evt-cart-item-001",
    "category": "Engagement",
    "dateTime": "2026-03-22T18:36:37.149Z",
    "deviceId": "anon-session-123",
    "sessionId": "anon-session-123",
    "eventType": "cartItem",
    "interactionName": "Add To Cart",
    "catalogObjectType": "Product",
    "catalogObjectId": "sample-product-001",
    "price": 1999,
    "quantity": 1,
    "cartEventId": "evt-cart-001"
  }
]
That leads to the key implementation rule for this chapter:
The schema must match the event shape that is actually forwarded to Data Cloud, not just the higher-level interaction object sent from the sitemap.
This matters especially for typed out-of-the-box patterns like cart and cart item events. If the real forwarded payload includes required fields that your schema does not model correctly, or if your schema marks fields as required that are not always present after transformation, validation can fail and the event will not be ingested.
When reviewing the schema, think in two layers:
- what the sitemap sends,
- what the SDK and CDP module ultimately forward to Data Cloud.
If you are coming from MCP
It is natural to compare this to Marketing Cloud Personalization, because both products use the word sitemap. The concept overlaps, but the implementation model is different.
1. The sitemap is tied to Data Cloud ingestion
In Salesforce Personalization, the setup path is explicit: create the website connector, upload the schema, add the Salesforce Interactions SDK, and upload a sitemap that works with that setup.1247
In MCP, the sitemap belongs to a different web integration model built around the MCP dataset, page types, content zones, templates, and campaigns.89
2. The event contract is more formal
With the website connector approach, the schema explicitly defines the event objects and required fields. Salesforce documents recommended mappings for standardized interaction types such as catalog, cart, order, consent, user, and account data.546
If you are used to MCP, the shift is mostly mental: instead of thinking in terms of a legacy dataset-specific event payload, think in terms of a connector schema plus the Interactions SDK event model.479
3. Transformers are used differently
In Salesforce Personalization, transformers belong to the Personalization module. They are used to convert Decisioning API responses into rendered HTML, usually through Handlebars templates and substitution mappings.101112
In MCP, the campaign template is usually the main rendering unit, including server-side TypeScript, Handlebars, client-side logic, and related gears like Recommendations or Flicker Defender.1314
4. Personalization requests are configured differently
In Salesforce Personalization, calling Personalization fetch is one valid pattern, but not the only one.1215
Another common approach is to configure a personalization experience that points to a PersonalizationPoint and then applies a transformer to the response. In that model, you define which point should be called, where the result should render, and which transformer should shape the output.10111215
For guide purposes, a simplified version looks like this:
SalesforceInteractions.Personalization.Config.initialize({
  additionalTransformers: [
    {
      name: "SimpleRecommendations",
      transformerType: "Handlebars",
      substitutionDefinitions: {
        title: { defaultValue: "[attributes].[Title]" },
        items: { defaultValue: "[data]" },
        id: { defaultValue: "[id]" },
        imageUrl: { defaultValue: "[imageUrl]" },
        productName: { defaultValue: "[name]" },
        price: { defaultValue: "[price]" },
      },
      transformerTypeDetails: {
        html: `
          <section class="recommendations">
            <h2>{{ subVar 'title' }}</h2>
            <div class="recommendation-grid">
              {{#each (subVar 'items')}}
                <a href="/products/{{subVar 'id'}}" class="recommendation-card">
                  <img src="{{subVar 'imageUrl'}}" alt="{{subVar 'productName'}}" loading="lazy" />
                  <h3>{{subVar 'productName'}}</h3>
                  <p>{{subVar 'price'}}</p>
                </a>
              {{/each}}
            </div>
          </section>
        `,
      },
    },
  ],
  personalizationExperienceConfigs: [
    {
      name: "HomepageRecommendations",
      dataProvider: {
        type: "PersonalizationPoint",
        referenceType: "ApiName",
        value: "Homepage_Recommendations",
      },
      sourceMatchers: [{ type: "PageType", value: "Homepage" }],
      transformationConfig: {
        when: "Immediately",
        method: "ReplaceElementContent",
        transformations: [
          {
            transformerName: "SimpleRecommendations",
            path: "#homepage-recommendations",
            tag: "DIV",
          },
        ],
      },
    },
  ],
});
In that pattern, the page does not render raw JSON directly. The Personalization point provides the data, and the transformer turns that response into markup on the page.101112
The concepts may sound familiar, but the delivery model is different enough that it is better to treat this as its own implementation path.
Recommended scope for a playground
Do not try to model the full site on the first pass.
Capture:
- only the interactions needed for the first use case,
- one or two likely personalization locations,
- a schema that covers the required events without over-designing everything up front.25
Also remember that Salesforce expects schema evolution to stay backward-compatible. After the schema is uploaded, you can extend it with new events and fields, but you should preserve the existing structure.125
This is especially important when working with required fields. With typed out-of-the-box events, you do not always control every field that appears in the final runtime payload. If a field is marked as required in your schema but is missing from the forwarded event, ingestion can fail.
Start small, but make the model clean.
Implementation Section: the conceptual overview ends here. If you already understand the connector, schema, SDK, and sitemap roles, start with the guide below.
Step-by-step guide
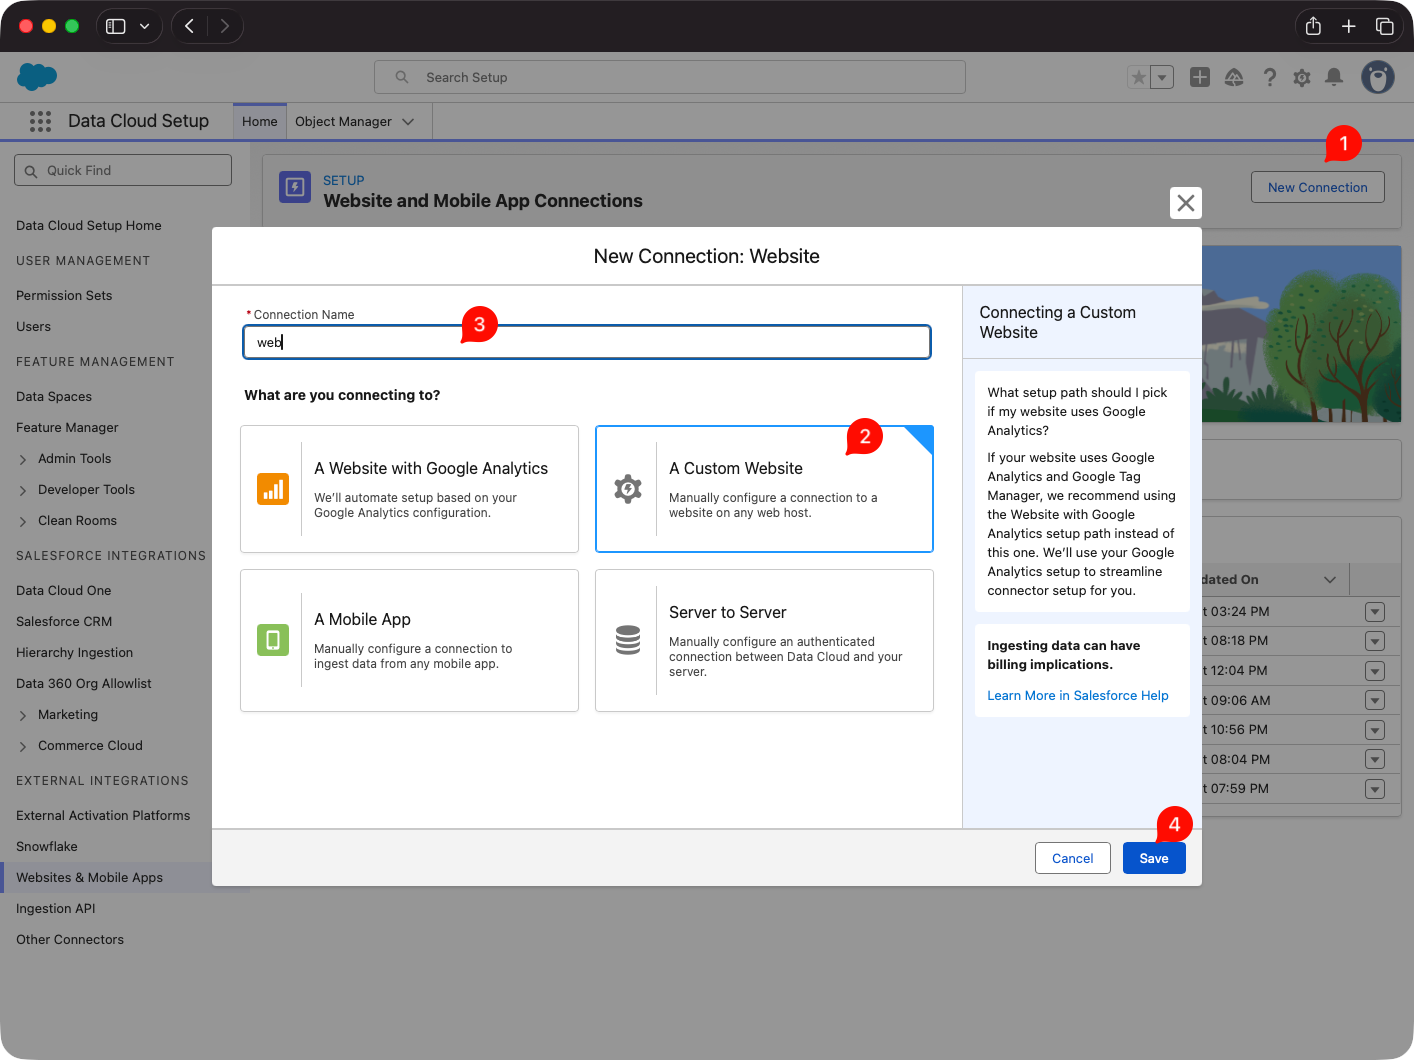
Step 1. Create the website connector
Go to:
Data Cloud Setup -> Websites & Mobile Apps -> New12
Create the connector for the website you want to use in the playground.
At this stage, think of the connector as the container for:
- the web source,
- the SDK integration details,
- the schema you will upload,
- the sitemap you will upload afterward.
Step 2. Add optional URL parameters only when needed
Salesforce lets you define UTM and custom URL parameters in the connector.1
For a playground build, only add them if you know you will use them. Otherwise, keep the setup simple.
Step 3. Build the sitemap locally first
Create sitemap.js and define the capture logic there.2
For the first version, focus on:
- page identification,
- the key user interactions,
- the business objects involved,
- the minimum values needed for future decisioning,
- the personalization locations you expect to enable later.
Avoid trying to capture every possible interaction on day one.
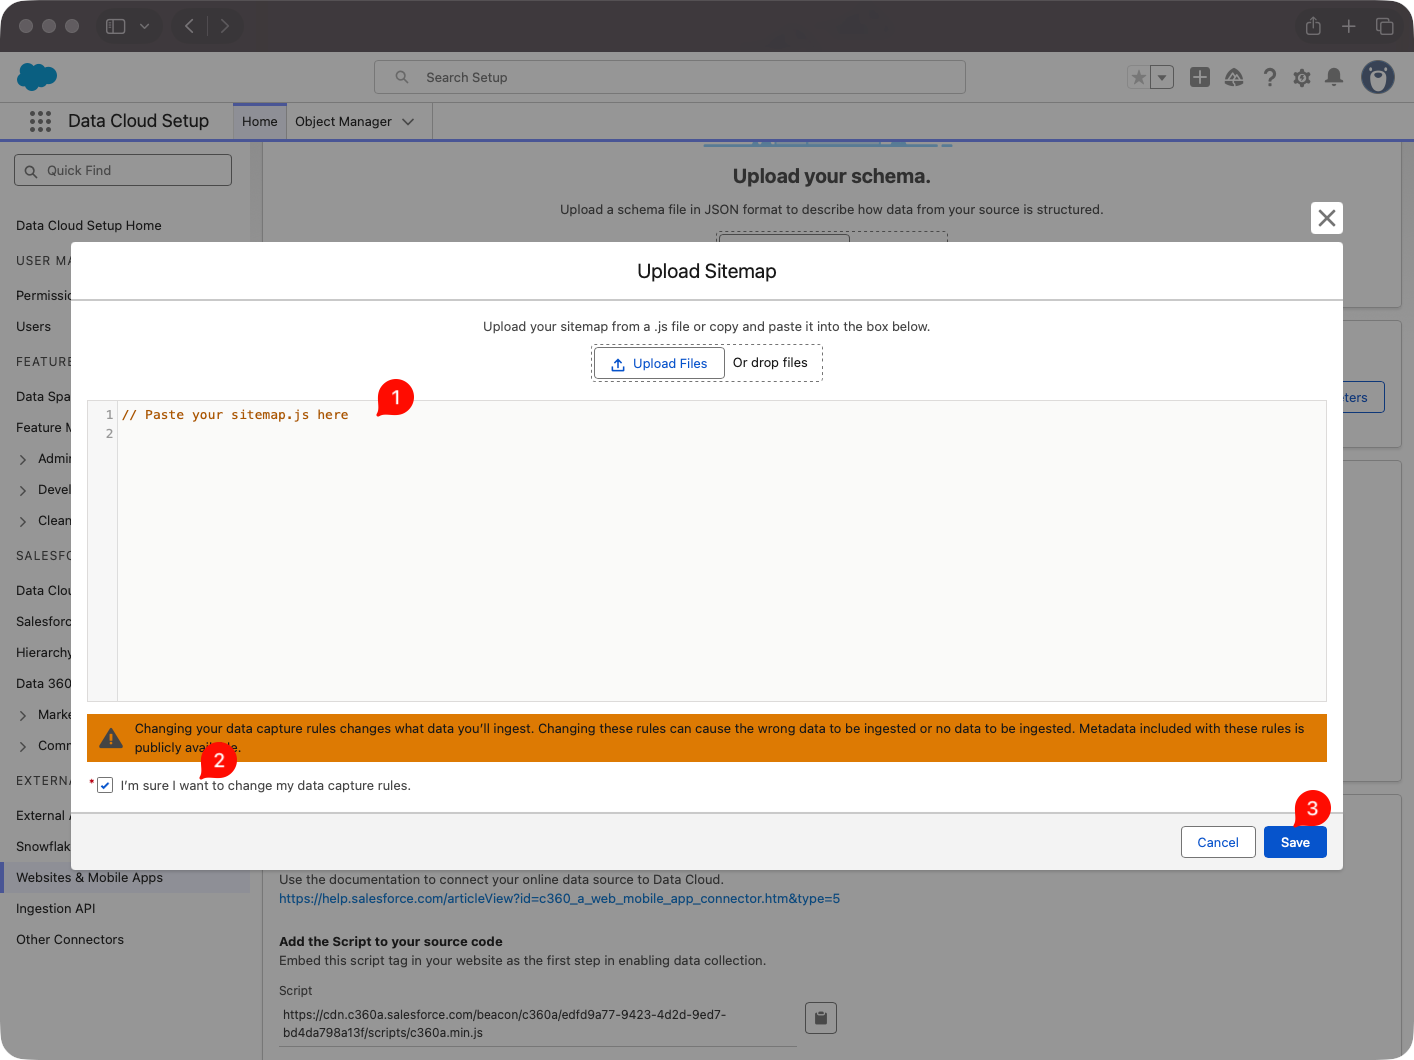
Step 4. Upload the sitemap to the connector
In the website connector setup page, open the Sitemap section, upload sitemap.js, review it for errors, and save it.2
At that point, the sitemap becomes a managed part of the connector configuration.
Step 5. Save the connector and copy the SDK CDN details
After saving the connector, open the integration guide section on the connector page and copy the CDN URL for the Salesforce Interactions SDK.2
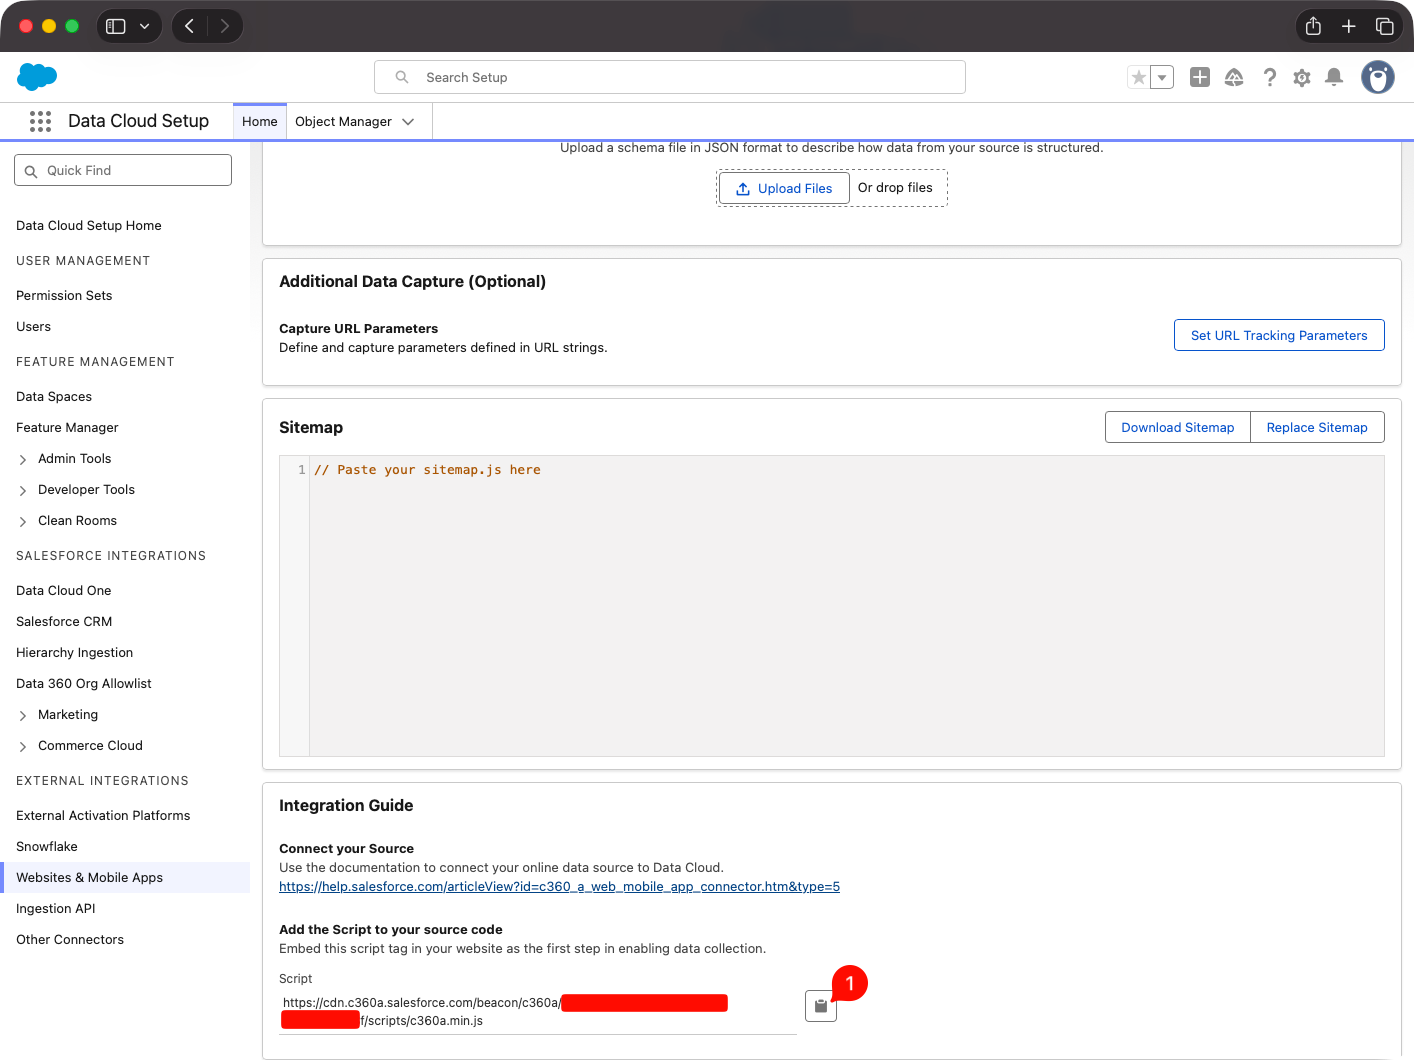
That is the script you will add to the website.
Step 6. Add the SDK to the site and initialize it
Add the SDK script to the <head> of the site.24
Once the SDK is on the site and the sitemap is uploaded, you can start observing real runtime behavior.
Step 7. Walk the site and inspect the forwarded events
Load the site with the SDK and sitemap in place, browse the target pages, and trigger the main interactions.
Use browser debugging tools and console inspection to see what the processed events actually look like after the SDK and CDP layer handle them.
This is the most important validation step in the chapter: build the schema from the forwarded event shape, not only from the higher-level interaction object you originally triggered in the sitemap.
Step 8. Build and validate the schema from observed traffic
Now prepare the JSON schema file for the website connector.125
In most cases, the fastest route is to start from Salesforce’s recommended schema and adjust it only for the event model your first use case actually needs.2
Review the schema carefully and confirm:
- the required events exist,
- the required fields are present,
- the event categories are correct,
- the developer names make sense long term,
- the fields marked as
requiredare truly safe to require in the real payload.15
Warning: once the schema is uploaded, treat it as stable. You can usually extend it later, but you should not design around the assumption that existing definitions will be easy to reshape.
Step 9. Upload the schema to the connector
Upload the validated JSON schema file to the website connector.125
This is the point where the connector receives the formal contract for the events Data Cloud will accept.
Step 10. Verify the result
By the end of this chapter, confirm that:
- the connector exists in Data Cloud,
- the sitemap is uploaded and saved,
- the SDK is present on the website,
- the real forwarded events were reviewed before the schema was finalized,
- the schema is uploaded and valid.
If all of that is true, the environment is ready for the next steps in data mapping and personalization logic.
Short version to remember
This chapter is not about advanced personalization logic yet.
It is about:
- creating the website connector,
- building the sitemap,
- uploading the sitemap,
- adding the Web SDK,
- walking the site and inspecting the forwarded events,
- building the schema from the real payload shape,
- uploading the schema,
- confirming that the web ingestion layer is live.
If you remember only one thing, make it this:
in Salesforce Personalization, the schema should match what the SDK and CDP layer actually forward to Data Cloud, not only the higher-level object you trigger in the sitemap.
Sources
Footnotes
-
Salesforce Developers, Connect a Website or Mobile App to Data 360 https://developer.salesforce.com/docs/data/data-cloud-int/guide/c360-a-set-up-mobile-web-connection.html ↩ ↩2 ↩3 ↩4 ↩5 ↩6 ↩7 ↩8 ↩9 ↩10 ↩11 ↩12
-
Salesforce Developers, Integrate the Salesforce Interactions SDK https://developer.salesforce.com/docs/marketing/einstein-personalization/guide/integrate-salesforce-interactions-sdk.html ↩ ↩2 ↩3 ↩4 ↩5 ↩6 ↩7 ↩8 ↩9 ↩10 ↩11 ↩12 ↩13 ↩14 ↩15 ↩16 ↩17 ↩18 ↩19 ↩20 ↩21 ↩22
-
Salesforce Developers, Web and Mobile App Connector https://developer.salesforce.com/docs/data/data-cloud-int/guide/c360-a-mobile-web-app-connector.html ↩ ↩2
-
Salesforce Developers, Capture Web Interactions https://developer.salesforce.com/docs/data/salesforce-interactions-sdk/guide/c360a-api-salesforce-interactions-web-sdk.html ↩ ↩2 ↩3 ↩4 ↩5 ↩6 ↩7 ↩8 ↩9
-
Salesforce Developers, Mobile and Web SDK Schema Quick Guide for Data 360 https://developer.salesforce.com/docs/data/data-cloud-int/guide/c360-a-mobile-web-sdk-schema-quick-guide.html ↩ ↩2 ↩3 ↩4 ↩5 ↩6 ↩7 ↩8 ↩9 ↩10 ↩11
-
Salesforce Developers, Web SDK Connector Mappings https://developer.salesforce.com/docs/data/data-cloud-int/guide/c360-a-web-connector-data-mappings.html ↩ ↩2 ↩3
-
Salesforce Developers, Personalize Web Experiences with the Salesforce Interactions SDK https://developer.salesforce.com/docs/marketing/einstein-personalization/guide/personalize-web-experiences.html ↩ ↩2
-
Salesforce Developers, The Personalization Sitemap https://developer.salesforce.com/docs/marketing/personalization/guide/personalization-sitemap.html ↩
-
Salesforce Developers, Marketing Cloud Personalization Web Integration https://developer.salesforce.com/docs/marketing/personalization/guide/web-integration.html ↩ ↩2
-
Salesforce Developers, Configure the Personalization Module https://developer.salesforce.com/docs/marketing/einstein-personalization/guide/configure-web-personalization.html ↩ ↩2 ↩3
-
Salesforce Developers, Initialize the Personalization Module https://developer.salesforce.com/docs/marketing/einstein-personalization/guide/initialize-einstein-personalization-module.html ↩ ↩2 ↩3
-
Salesforce Developers, Request Personalization Through the Sitemap https://developer.salesforce.com/docs/marketing/einstein-personalization/guide/request-personalization-through-sitemap.html ↩ ↩2 ↩3 ↩4
-
Salesforce Developers, Web Campaigns and Templates https://developer.salesforce.com/docs/marketing/personalization/guide/web-campaigns-templates.html ↩
-
Salesforce Developers, Recommendations https://developer.salesforce.com/docs/marketing/personalization/guide/recommendations.html ↩
-
Salesforce Help, Salesforce Personalization https://help.salesforce.com/s/articleView?id=mktg.mc_persnl.htm&language=en_US&type=5 ↩ ↩2